MECHANICAL TECHNOLOGY(WELDING) GRADE 12 QUESTIONS - NSC PAST PAPERS AND MEMOS NOVEMBER 2019
Share via Whatsapp Join our WhatsApp Group Join our Telegram GroupMECHANICAL TECHNOLOGY: WELDING AND METALWORK
GRADE 12
NOVEMBER 2019
NATIONAL SENIOR CERTIFICATE
INSTRUCTION AND INFORMATION
- Write your centre and examination numbers on the ANSWER BOOK.
- Read ALL the questions carefully.
- Answer ALL the questions.
- Number the answers correctly according to the numbering system used in this question paper.
- Start EACH question on a NEW page.
- Show ALL calculations and units. Round off final answers to TWO decimal places.
- Candidates may use non-programmable scientific calculators and drawing instruments.
- The value of gravitational acceleration should be taken as 10 m/s2.
- All dimensions are in millimetres, unless stated otherwise in the question.
- Write neatly and legibly.
- A formula sheet is attached at the end of the question paper.
- Use the criteria below to assist you in managing your time.
| QUESTION | CONTENT | MARKS | TIME in minutes |
| GENERIC | |||
| 1 | Multiple-choice questions | 6 | 6 |
| 2 | Safety | 10 | 10 |
| 3 | Materials | 14 | 14 |
| SPECIFIC | |||
| 4 | Multiple-choice questions | 14 | 10 |
| 5 | Terminology (Lathe and Milling Machine) | 18 | 20 |
| 6 | Terminology (Indexing) | 28 | 25 |
| 7 | Tools and Equipment | 13 | 10 |
| 8 | Forces | 33 | 33 |
| 9 | Maintenance | 18 | 12 |
| 10 | Joining Methods | 18 | 12 |
| 11 | Systems and Control (Drive Systems) | 28 | 28 |
| TOTAL | 200 | 180 |
QUESTION 1: MULTIPLE-CHOICE QUESTIONS (GENERIC)
Various options are provided as possible answers to the following questions. Choose the answer and write only the letter (A–D) next to the question numbers (1.1 to 1.6) in the ANSWER BOOK, e.g. 1.7 E.
1.1 The workplace is organised by national policies and procedures dealing with HIV/Aids. What is the purpose of this code of practice?
- The act on safety states that all employers must make sure that the workplace is safe and that employees are not at risk of becoming ill or injured at work.
- The act contains common guidelines on how employers, employees and trade unions should respond to HIV/Aids in the workplace.
- Employers may not demote or promote an employee based on his/her HIV/Aids status.
- Employers can dismiss a person who is infected with HIV/Aids. (1)
1.2 During which ONE of the following work processes do you have to wear a helmet to prevent harmful ultra violet rays?
- Lathe work
- Angle grinding
- MIG/MAGS welding
- Drilling (1)
1.3 Which ONE of the following describes a workshop layout?
- Process layout
- Drill layout
- Inspection layout
- Receiving layout (1)
1.4 Which heat treatment process is used to increase the surface hardness of a steel shaft?
- Annealing
- Tempering
- Case hardening
- Normalising (1)
1.5 The purpose of hardening steel is to …
- increase the resistance against denting.
- increase the toughness.
- soften it.
- improve the welding results. (1)
1.6 Which ONE of the following tests can be classified as a non-destructive test?
- Bend
- Machinability
- X-ray
- Nick-break (1)
[6]
QUESTION 2: SAFETY (GENERIC)
2.1 State ONE important safety rule that should be adhered to before any machine in the mechanical workshop is switched on.(1)
2.2 Give ONE reason why you need to clamp down a small work piece before any drilling is done.(1)
2.3 State TWO safety rules you should observe before a hydraulic press is used. (2)
2.4 Give TWO reasons why you have to use surgical gloves when treating a co-worker with open wounds.(2)
2.5 State TWO safety precautions that must be taken into consideration for the safe handling of portable electrical equipment.(2)
2.6 State ONE responsibility of an employer regarding safety in the work place. (1)
2.7 State ONE responsibility of an employee regarding safety in the work place. (1)
[10]
QUESTION 3: MATERIALS (GENERIC)
3.1 Explain how you will prevent damage to a file when conducting a filing test on a hard metal.(2)
3.2 What is the purpose of the heat treatment of steel?(2)
3.3 Give TWO reasons for tempering hardened steel.(4)
3.4 Describe how the following heat treatment processes are carried out on steel:
3.4.1 Annealing(3)
3.4.2 Hardening(3)
[14]
QUESTION 4: MULTIPLE-CHOICE (SPECIFIC)
Various options are provided as possible answers to the following questions. Choose the answer and write only the letter (A–D) next to the question numbers (4.1 to 4.14) in the ANSWER BOOK, e.g. 4.15 E.
4.1 Identify the template shown in FIGURE 4.1 below.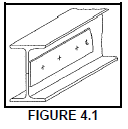
- Left-hand flange template
- Right-hand flange template
- Strip template
- Web template (1)
4.2 FIGURE 4.2 below shows a portion of a roof truss. Identify component Y.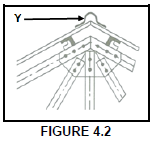
- Ridging
- Cleat
- Roof sheet
- Purlin (1)
4.3 Which ONE of the following tools is used for cutting external thread?
- Bottoming tap
- Taper tap
- Die
- Wrench (1)
4.4 Which ONE of the following methods is the safest and most efficient method to lubricate guillotine parts?
- Splash feed lubrication method
- Pressure feed lubrication method
- Force feed lubrication method
- Centralised lubrication piping method (1)
4.5 FIGURE 4.5 below shows an oxygen regulator. Identify component X.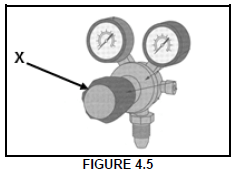
- Bonnet
- Pressure adjusting knob
- Outlet port
- Diaphragm encased in bonnet (1)
4.6 A tie is defined as a member of a framework resisting a … force.
- linear
- shear
- compressive
- tensile (1)
4.7 Safe working stress is defined as the …
- internal resistance in a body to an external force or load.
- internal force present in a material when an external tensile force is applied.
- minimum allowable stress in a material to prevent it from yielding.
- maximum allowable stress in a material to prevent it from yielding. (1)
4.8 What is the magnitude of force P in FIGURE 4.8 below?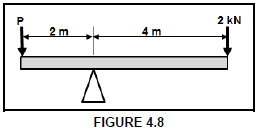
- 6 kN
- 8 kN
- 4 kN
- 12 kN (1)
4.9 Identify the type of beam in FIGURE 4.9 below.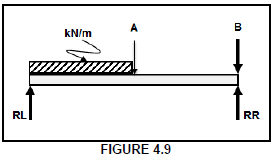
- Supported beam with a uniformly distributed load (UDL)
- Simply supported beam with a shear force
- Cantilever beam
- Bending moment beam (1)
4.10 Which ONE of the following testing processes is used to test the deflection of a beam?
- Filing test
- Spark test
- Bending test
- Machining test (1)
4.11 Ultrasonic inspection techniques use … to detect flaws in welded joints.
- sound
- liquid
- film
- light (1)
4.12 The maximum gap between the grinding wheel and the tool rest on a bench grinder is …
- 1 mm.
- 2 mm.
- 3 mm.
- 4 mm. (1)
4.13 Which ONE of the following is a factor to be considered when selecting the cutting speed of a drill bit?
- Use of cutting fluid
- Type of material
- Cutting angle
- Spindle size (1)
4.14 What is the magnitude of the base circumference of the cone shown in FIGURE 4.14 below?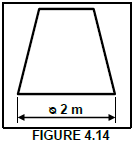
- 3,10 m
- 3,14 m
- 5,28 m
- 6,28 m (1)
[14]
QUESTION 5: TERMINOLOGY (TEMPLATES) (SPECIFIC)
5.1 What does the abbreviation OSU stand for with regard to a template? (2)
5.2 Explain what a plate girder is as used on a beam. (2)
5.3 What is the purpose of supplementary weld symbols? (1)
5.4 State FOUR examples of fusion welds. (4)
5.5 Identify the following supplementary weld symbols: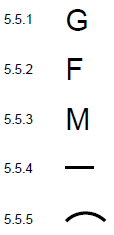
5.6 A mild steel ring with an outside diameter of 300 mm must be fabricated from a 60 x 20 mm rectangular plate, as shown in FIGURE 5.6 below. Calculate the dimensions of the material required to fabricate the steel ring. (7)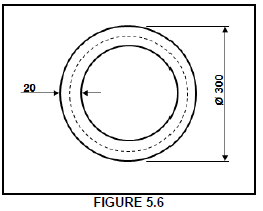
5.7 Identify the TWO dimensions of the weld as shown in FIGURE 5.7 below. (2)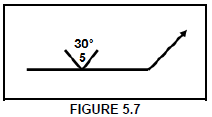
[23]
QUESTION 6: TOOLS AND EQUIPMENT (SPECIFIC)
6.1 Explain the operating principle of the following machines, used in the welding workshop:
6.1.1 Power saw (Reciprocating) (4)
6.1.2 Manual guillotine (4)
6.1.3 Horizontal pyramid rolls (4)
6.2 State THREE uses of the bench grinder. (3)
6.3 Name THREE types of material that can be cut with a plasma cutter. (3)
[18]
QUESTION 7: FORCES (SPECIFIC)
7.1 FIGURE 7.1 below shows a steel framework. Determine graphically the magnitude and nature of the forces in the following members: AD, BD and CD.
SCALE: Space diagram: 1 : 100
Force diagram: 1 mm = 5 N (12)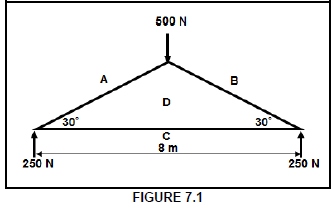
7.2 FIGURE 7.2 below shows a beam, 10 m long, that is subjected to two vertical forces. A force of 4 kN is 3 m from point A and a force of 2 kN is 7 m from point A.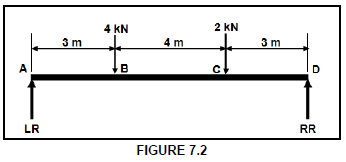
Calculate the:
7.2.1 Reactions at supports LR and RR (6)
7.2.2 Bending moments (BM) at each point (A–D) on the beam (4)
7.2.3 Shear forces (SF) at each point (A–D) on the beam (4)
7.2.4 Draw to scale (a) the shear force (SF) and (b) the bending moments (BM) diagrams.
SCALE: Space diagram – 1 : 100
SF diagram: 5 mm = 1 kN
BM diagram: 5 mm = 1 kN.m (2 x 3) (6)
7.3 The original length of a 10 mm round bar is 20 m. It stretches by 0,6 mm when subjected to a tensile load of 50 kN.
7.3.1 Calculate the stress in the round bar. (5)
7.3.2 Calculate the strain in the round bar. (Answer in full decimals.) (3)
7.3.3 Calculate the final length of the round bar. (Answer in full decimals.) (2)
7.3.4 Calculate Young's modulus of elasticity for the round bar material in GPa. (3)
[45]
QUESTION 8: JOINING METHODS (WELD INSPECTION) (SPECIFIC)
8.1 State TWO causes of EACH of the following arc-welding defects:
8.1.1 Undercutting (2)
8.1.2 Slag inclusion (2)
8.2 Name TWO factors that determine the gas pressure during oxy-acetylene welding. (2)
8.3 Name TWO factors that determine the current setting in arc welding. (2)
8.4 State TWO preventative measures for the following welding defects during arc welding:
8.4.1 Porosity (2)
8.4.2 Incomplete penetration (2)
8.5 Name TWO types of welding defects that are observed when a guided bend test is conducted on a welded joint. (2)
8.6 Name THREE elements that should be inspected during the visual inspection of an arc welded joint. (3)
8.7 Describe the steps to be followed when performing an X-ray test on a welded joint. (6)
[23]
QUESTION 9: JOINING METHODS (STRESSES AND DISTORTION) (SPECIFIC)
9.1 What is distortion on a welded joint? (2)
9.2 Describe the effect of cold working on steel. (4)
9.3 Describe TWO factors that affect distortion and residual stress in a welded joint. (4)
9.4 State THREE aspects that will determine the rate of cooling during the welding process. (3)
9.5 FIGURE 9.5 below shows the iron-carbon equilibrium diagram. Label the structures according to the letters (A–E). (5)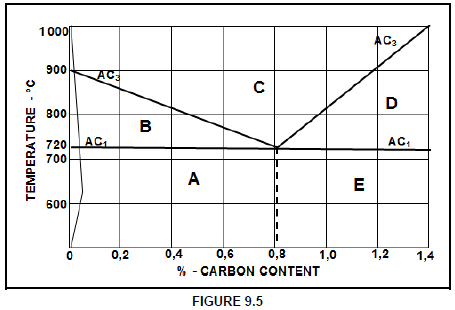
[18]
QUESTION 10: MAINTENANCE (SPECIFIC)
10.1 Discuss ONE reason why one applies lock-out on large machines before maintenance. (2)
10.2 Why do tagging plates, used to lock-out and tag machines during maintenance, have multiple holes? (1)
10.3 Maintenance is essential to ensure a safe working environment. State TWO aspects that should NOT be ignored during this process. (2)
10.4 State TWO general maintenance guidelines of the horizontal band saw. (2)
10.5 State TWO effects due to overloading of a rolling machine. (2)
[9]
QUESTION 11: TERMINOLOGY DEVELOPMENT (SPECIFIC)
11.1 FIGURE 11.1 below shows an off-centre square to rectangular hopper.
Vertical height (VH) of the hopper = 500 mm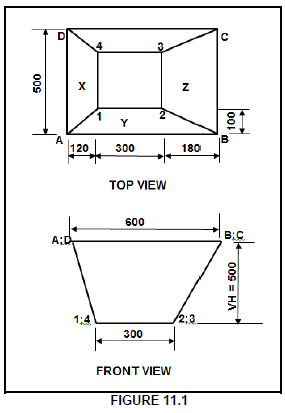
Calculate the true length of:
11.1.1 A-1 (4)
11.1.2 A-2 (4)
11.1.3 B-2 (4)
11.1.4 B-3 (4)
11.1.5 D-1 (4)
[20]
TOTAL: 200
FORMULA SHEET FOR MECHANICAL TECHNOLOGY (WELDING AND METALWORK)
- STRESS AND STRAIN
1.1 Stress = Force or σ = F
Area A
1.2 Strain (ε) = change in length (ΔL)
original length (L)
1.3 Young's modulus ( E ) = stress or ( σ )
strain ε
1.4 Ashaft = πd 2
4
1.5 Apipe =π(D2 - d2)
4 - PYTHAGORAS' THEOREM AND TRIGONOMETRY

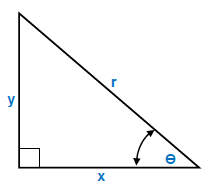
2.1 sinθ = y
r
2.2 cosθ = x
r
2.3 tanθ = y
x
2.4 r2 = x2 + y2 - TEMPLATES AND DEVELOPMENTS
3.1 Mean Ø = outside Ø – plate thickness where Ø = diameter
Mean Ø = inside Ø + plate thickness
3.2 Mean circumference = π x mean diameter
