COMPUTER APPLICATIONS TECHNOLOGY PAPER 1 GRADE 12 QUESTIONS - NSC PAST PAPERS AND MEMOS MAY/JUNE 2019
Share via Whatsapp Join our WhatsApp Group Join our Telegram GroupCOMPUTER APPLICATIONS TECHNOLOGY PAPER 1
GRADE 12
NATIONAL SENIOR CERTIFICATE EXAMINATIONS
MAY/JUNE 2019
INSTRUCTIONS AND INFORMATION
- Owing to the nature of this practical examination, it is important to note that, even if you complete the examination early, you will NOT be permitted to leave the examination room until all the administrative functions associated with the examination have been finalised. During the examination, normal rules regarding leaving the examination room apply.
- If you are working on the network, or the data files have been preloaded, you must follow the instructions provided by the invigilator/teacher. Alternatively, the invigilator will give you a CD/DVD/flash drive containing all the files needed for the examination. If a CD/DVD/flash drive has been issued to you, you must write your examination number and centre number on the CD/DVD/flash drive.
- At the end of the examination, you must hand in the CD/DVD/flash drive given to you by the invigilator with ALL your answer files saved onto the CD/DVD/flash drive, OR you should make sure that ALL the answer files are saved on the network/computer as explained to you by the invigilator/teacher.
- Make absolutely sure that ALL files can be read. Do NOT save unnecessary files/folders and do NOT hand in duplicate answer files/folders. Do NOT delete any original files that you did not work on.
- The information sheet that has been provided with the question paper MUST BE COMPLETED AFTER THE THREE-HOUR EXAMINATION SESSION. Hand it to the invigilator at the end of the examination.
- A copy of the master files will be available from the invigilator. Should there be any problems with a file, you may request another copy from the invigilator.
- This question paper consists of SEVEN questions. Answer ALL the questions.
- Read through each question before answering or solving the problem. Do NOT do more than is required by the question.
- Ensure that you save each document using the file name given in the question paper. Save your work at regular intervals as a precaution against possible power failures.
- You may NOT use any resource material.
- Accuracy will be taken into account, e.g. if a question requires the answer to be in cell F3 in a spreadsheet, and you enter the answer in cell G4, it will NOT be marked.
- Ensure that the regional settings are set to South Africa and date and time settings, number settings and currency settings are correctly set.
- In all questions involving word processing, you should set the language to English (South Africa). The paper size is assumed to be A4 Portrait, unless instructed otherwise. Use centimetres as the unit of measurement.
- Formulae and/or functions must be used for ALL calculations in questions involving spreadsheets. Use absolute cell references only where necessary to ensure that formulae are correct when you copy them to other cells in a spreadsheet.
NOTE: All formulae and/or functions should be inserted in such a manner that the correct results will still be obtained even if changes are made to the existing data. - You may NOT use a word processing program such as Word to answer the HTML question.
- The examination folder/CD/DVD/flash drive that you receive with this question paper contains the files listed below. Ensure that you have all the files before you begin with this examination.
|
SCENARIO
The art committee in your neighbourhood wishes to use art to decorate the streets. You were asked to give them information about street art.
QUESTION 1: WORD PROCESSING
Open the 1Street word processing document about street art and insert your examination number in the header or footer.
1.1 Make the following changes to the cover page:
1.1.1 Insert the text 'Street' into the 'Title' content control. (1)
1.1.2 Change the font size of the 'A' to 200 pt. (1)
1.1.3 Display ONLY the inside borders of the table in a red colour. (2)
1.1.4 Align the picture in the bottom left cell of the table so that it appears in the centre of the cell. (1)
1.2 The entry 'http://www.widewalls.ch/defining-street-art/' should NOT appear in the table of contents on the second page.
Make the necessary changes so that the entry will NOT appear in the table of contents.
Update the table of contents. (2)
1.3 Change the bottom page margin to 2 cm from the bottom, from page 3 onwards. (2)
1.4 Find the paragraph that begins with 'What exactly is …' and ends with '… go from here?' on the third page.
1.4.1 Change the line spacing of the paragraph to 20 pt at least. (2)
1.4.2 Change the indentation to appear as follows:![]()
What exactly is the question we are facing here? How would it be possible to define street art? It could be argued that it is a question for art historians or cultural theorists. However, the first group of thinkers seems to be in need of a temporal distance – there has to (2)
1.5 The decades are referred to as 1970's, 1980's, etc. Use a word processing feature to remove the apostrophe between the decades and the 's', e.g. 1970s.
HINT: Use 0 and not the full year. (3)
1.6 Highlight the text that the bookmark 'Graffiti' refers to in any colour of your choice. (1)
1.7 Find the picture after the heading 'Repetition and Evolution'.
Add an automatic caption with the text 'Art 1: Vhils process' AND display the caption above the image. (3)
1.8 Change the numbered list after the heading 'Defining Street Art Does (not) Have a Conclusion' to a bulleted list.
Use the symbol ![]() (Wingdings 2, character code 147) for the bullet. (2)
(Wingdings 2, character code 147) for the bullet. (2)
1.9 Insert an automatic table of figures after the text 'Table of Figures' on the last page to display only the 'Figure' images. (2)
1.10 Remove the source, 'Banksy, J.R.; Just Google it', from the sources.(1)
1.11 Insert an automatic bibliography on the last page. (1)
1.12 Insert page numbers in the page footer as follows:
- Use any 'Mosaic' page numbering style.
- Align the odd page numbers to the left of the footer.
- Align the even page numbers to the right of the footer. (4)
Save and close the 1Street document.
[30]
QUESTION 2: WORD PROCESSING
Open the 2Donations word processing document that contains information about donations for art created by Banksy, and insert your examination number in the header or footer.
2.1 Correct the spelling error in the document. (1)
2.2 Change the form control next to the text 'Date' on the first page to accept the current date in the format dd MMMM yyyy. (2)
2.3 Find the text that starts with '1. Set an example' and ends with '… others who need it.'.
- Format this text to appear in four columns.
- Ensure that a numbered heading appears at the top of each column. (2)
2.4 Add an endnote to the text 'Utopia' as follows:
- Use capital Roman numerals for the number format.
- Add the text 'Perfect world' as the endnote.
- Add the endnote to the end of the section. (4)
2.5 Find the table below the text 'Choose an …' and do the following:
2.5.1 Apply any table style, other than the 'Table Grid' style, to the table. (1)
2.5.2 Replace the symbol in the second row of the second column with a suitable form field. (2)
2.5.3 Add help text to the textbox form field in the second row of the third column of the table so that, when F1 is pressed, the text 'Enter amount' displays. (2)
2.5.4 Replace the text 'Insert calculation' in the last row of the table with a formula to calculate the total amount of the donations. (2)
Save the 2Donations document, but do NOT close it.
2.6 This document will be sent to specific recipients. Use the 2Donors spreadsheet as the data source for a mail merge.
- Select only donors who have donated R50 000 or more.
- Remove Roland Lewis from the recipient list in the mail merge.
- Replace the text <<Name>> <<Surname>> at the end of the document with the merge fields Name and Surname.
- Save the document before completing the mail merge.
- Complete the merge and save the new merged document as 2Merged. (4)
Save and close the 2Donations document.
[20]
QUESTION 3: SPREADSHEET
NOTE:
- Use formulae and/or functions for ALL calculations in the spreadsheet.
- Use absolute cell references ONLY where necessary to ensure that formulae are correct when you copy them to other cells in the same column (copy down).
- Insert formulae and/or functions in such a manner that the correct results will still be obtained, even if changes are made to the existing data.
- Use the allocated area in the spreadsheet, should you need to use building blocks.
You were asked to assist with the administration of the Street Art competition.
Open the 3Comp spreadsheet.
Work in the Entries_Inskrywings worksheet.
3.1 Merge cells A1:M1 and centre the data vertically. (2)
3.2 Fill the cells A1:M1 with any blue pattern of your choice. (2)
3.3 Continue the numbering pattern given in cells A3:A6 to allocate a number to EVERY participant. (1)
3.4 Insert a formula in cell D3 to display only the participants' initials from column B.
NOTE: Some participants have more than one initial. (5)
3.5 Insert a formula in cell F4 to allocate a unique code to each participant as follows:
- The value in cell A4, followed by
- The province in cell E4, followed by
- A randomly generated two-digit number (5)
3.6 Use a function in cell G5 to determine the full name of the province for the code in cell E5.
Use the data in the Province_Provinsie worksheet and ensure that the formula will work correctly when copied to the rest of the cells. (5)
3.7 Insert a function in cell M3 to calculate the average score for the three rounds in cells J3:L3.
Format the answer to display no decimal places. (3)
3.8 The winner of the competition will be announced 31 days after the closing date, e.g. if the closing date is 30/07/2019, the announcement will be made on 30/08/2019.
Determine the date on which the winner will be announced in cell P2 by using the date in cell P1 and appropriate DATE functions. (4)
Work in the Subtotal worksheet.
3.9 Use the SUBTOTAL feature to display the maximum total marks for each category. (3)
Save and close the 3Comp spreadsheet.
[30]
QUESTION 4: SPREADSHEET
NOTE:
- Use formulae and/or functions for ALL calculations in the spreadsheet.
- Use absolute cell references ONLY where necessary to ensure that formulae are correct when you copy them to other cells in the same column (copy down).
- Insert formulae and/or functions in such a manner that the correct results will still be obtained, even if changes are made to the existing data.
- Use the allocated area in the spreadsheet, should you need to use building blocks.
The organiser of the competition would like a breakdown of the information of the competition per province.
Open the 4Entries spreadsheet.
4.1 Change the tab colour of the Chart_Grafiek worksheet to yellow. (1)
4.2 Swop the order of the two worksheets so that the Provinces_Provinsies worksheet appears first. (1)
Work in the Provinces_Provinsies worksheet.
4.3 Insert a function in cell M7 to determine the number of entries from Limpopo (LP) (column C). (3)
4.4 Sort only the data in cells L3:M11 in descending order according to province. (2)
4.5 Use a spreadsheet feature to apply any shading to all the cells that contain dates that appear more than once in column E. (2)
4.6 Use a formula in column J to display the surname of the overall winner who achieved the highest total points (column I).
Copy the formula down to the other cells in column J. (7)
Work in the Chart_Grafiek worksheet.
4.7 Change the chart/graph to display similar to the one shown below.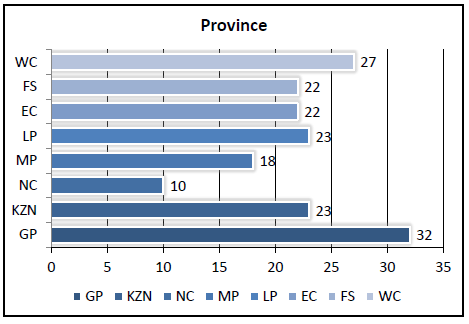
NOTE:
- Change the chart/graph to a bar chart/graph.
- Remove the data of the province with the least number of entries from the chart/graph. Do NOT remove the data from the spreadsheet.
- Apply any glow effect to the data series.
- Change the gap width to 50%.
- Change the colour of the major vertical gridlines to red. (5)
Save and close the 4Entries document.
[21]
QUESTION 5: DATABASE
Open the 5Gallery database, which contains details of galleries and exhibits.
5.1 Open the tblExhibit table in Design View and do the following:
5.1.1 Change the City field size to 50. (1)
5.1.2 Change the format of the GalleryName field to always display the data in uppercase. (1)
5.1.3 The PostCode field should always contain four digits, e.g. 0001, 0235, 1245.
Change the PostCode field properties so that it will always accept and display ONLY four digits. (3)
5.1.4 The stock in the gallery should be insured for 25% more than the total value of the stock (TotalValue).
Insert a new field named 'Insure' with a calculated data type to determine the insured value of the stock.
NOTE: Ignore the format of the new field. (5)
Save and close the tblExhibit table.
5.2 Create a form called frm5_2 as follows:
- Base the form on the qry5_2 query.
- Include all the fields of the query.
- Change the heading in the form header to 'Street Art'.
- Insert the 5Street image found in your examination folder as the background of the form.
- Sort the data in the form alphabetically according to the GalleryName field.
Save and close the frm5_2 form. (8)
5.3 Open the qry5_3 query in Design View.
Modify the query so that the total stock value of all the galleries in each province is displayed as follows: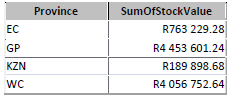
NOTE: Do NOT include any records where the province is not indicated.
Save and close the qry5_3 query. (3)
5.4 Open the qry5_4 query in Design View and change the query to display the following information:
- Display only the GalleryName and NoInStock fields.
- Display only street art where the gallery name includes the word 'gallery' AND where the province is unknown.
Save and close the qry5_4 query. (7)
5.5 Open the qry5_5 query in Design View.
Galleries that have 150 or more items in stock plan to run an exhibition for 30 days.
- Add a calculated field called End to determine the date on which the exhibition should end.
- Display only galleries in Johannesburg where there are more than 150 items in stock.
- Display only the galleries where the date on which the exhibition starts is in 2019.
Save and close the qry5_5 query. (8)
5.6 Open the rpt5_6 report in Design View and do the following: Remove the Province grouping and any other reference to the Province data or label. Insert a function in the textbox in the report footer to display the average value of all the stock in the galleries. Save and close the rpt5_6 report. (4) Save and close the 5Gallery database. [40]
QUESTION 6: WEB DESIGN (HTML)
A website was created to display the top five street artworks.
Open the incomplete 6Famous web page in a web browser and also in a text/HTML editor. You may NOT use a word processing program such as Word to answer the HTML question.
NOTE:
- Question numbers are inserted as comments in the coding to show approximately where the answer(s) should be inserted. Do NOT delete these comments.
- An HTML tag sheet has been attached for reference.
Your final web page should appear as shown in the example below.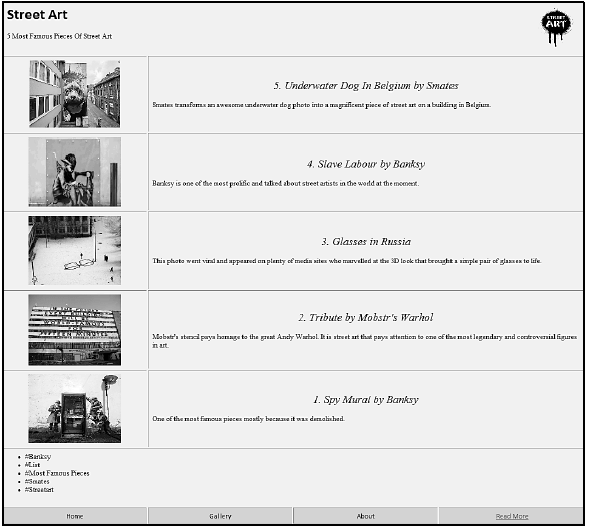
NOTE: Use the example on the previous page to guide you in answering these questions.
ONE mark will be allocated for closing tags, triangular brackets and nesting correctly used. (1)
6.1 Display the text 'Famous Street Art' as the title in the browser tab. (1)
6.2 Set the cell padding of the entire table to 8. (2)
6.3 Align the picture 6_Art to the right of the page. (1)
6.4 Display the heading 'Street Art' in Calibri font. (1)
6.5 Change the width of the 6_5.jpg picture to 195 and the height to 145. (2)
6.6 Correct the HTML code found below the comment <!--6.6--> so that the table includes a row containing the image 6_3.jpg and the text '3. Glasses in Russia …' to '… glasses to life.', as shown in the example on the previous page. (7)
6.7 Apply bullets to the data in the seventh row of the table. (2)
6.8 Insert a hyperlink on the text 'Read More' to link to the website Google.com. (3)
Save and close the 6Famous web page.
[20]
QUESTION 7: GENERAL
Some documents regarding street art need to be completed.
7.1 Open the 7Logo document.
Use the images provided in the document to create a logo to appear similar to the one below.
Save and close the 7Logo document. (7)
7.2 Open the 7Globe word processing document.
7.2.1 Insert a text watermark with the text 'Graffiti'. (2)
7.2.2 Sort the paragraphs below the heading 'North America' from the text 'New York City …' to the text '… colourful imagery' in descending order. (2)
7.2.3 Insert the text from the 7Europe.html file found in your examination folder at the end of the document.
NOTE: The text should be linked to the original document. (2)
Save and close the 7Globe document.
7.3 The 7Art spreadsheet contains information about art exhibitions.
7.3.1 An art gallery will only be considered for a prize if their exhibitions occurred on or before the current date AND if there are more than 100 exhibitors.
Insert a function in cell G3 to determine if an art gallery qualifies for the prize, or not. Display "TRUE" if a gallery qualifies.
NOTE: Use the date provided in cell I2. (5)
7.3.2 The province with the highest number of exhibitors will be given a prize.
Determine which province will receive the prize. Type your answer in cell A1.
NOTE:
- You may use any method/application to obtain the final answer.
- Ensure that your final answer displays in the 7Art document. (1)
Save and close the 7Art document. [19]
TOTAL: 180
HTML TAG SHEET Basic Tags
| Basic Tags | |
| Tag | Description |
| <body></body> | Defines the body of the web page |
| <body bgcolor="pink"> | Sets the background colour of the web page |
| <body text="black"> | Sets the colour of the body text |
| <head></head> | Contains information about the web page |
| <html></html> | Creates an HTML document – starts and ends a web page |
| <title></title> | Defines a title for the web page |
| <br/> | Inserts a line break |
| <!-- --> | Comment |
| Text Tags | |
| Tag | Description |
| <hl></hl> | Creates the largest heading |
| <h6></h6> | Creates the smallest heading |
| <b></b> | Creates bold text |
| <i></i> | Creates italic text |
| <font size="3"></font> | Sets size of font, from "1" to "7" |
| <font color="green"> </font> | Sets font colour |
| <font face="Times New Roman"></font> | Sets font type |
| Link Tags | |
| Tag | Description |
| <a href="/URL"></a> | Creates a hyperlink |
| <a href="/URL"><img src="/name"></a> | Creates an image link |
| <a name="NAME"></a> | Creates a target location in the document |
| <a href= "#NAME"></a> | Links to a target location created somewhere else in the document |
| Formatting Tags | |
| Tag | Description |
| <p></p> | Creates a new paragraph |
| <p align="left"> | Aligns a paragraph to the "left" (default), can also be "right" or "center" |
| <br/> | Inserts a line break |
| <ol></ol> | Creates a numbered list |
| <ol type="A","a", "I","i","1"></ol> | Defines the type of numbering used |
| <ul></ul> | Creates a bulleted list |
| <ul type="disc", "square","circle"> </ul> | Defines the type of bullets used |
| <li></li> | Inserted before each list item, and adds a number or symbol depending on the type of list selected |
| <img src="/name"> | Adds an image |
| <img src="/name" align="left"> | Aligns an image: can be "left", "right", "center", "bottom", "top", "middle" |
| <img src="/name" border="1"> | Sets the size of the border around an image |
| <img src="/name" width="200" height ="200"> | Sets the height and width of an image |
| <img src="/name" alt="alternative text"> | Displays alternative text when the mouse hovers over the image or when the image is not found |
| <hr/> | Inserts a horizontal line |
| <hr size="3"/> | Sets size (height) of a line |
| <hr width="80%"/> | Sets the width of a line, in percentage or absolute value |
| <hr color= "ff0000"/> | Sets the colour of the line |
| Table Tags | |
| Tag | Description |
| <table></table> | Creates a table |
| <tr></tr> | Creates a row in a table |
| <td></td> | Creates a cell in a table |
| <th></th> | Creates a table header (a cell with bold, centred text) |
| <table width="50"> | Sets the width of the table |
| <table border="1"> | Sets the width of the border around the table cells |
| <table cellspacing="1"> | Sets the space between the table cells |
| <table cellpadding="1"> | Sets the space between a cell border and its contents |
| <tr align="left"> | Sets the alignment for cell(s) ("left", can also be "center" or "right") |
| <tr valign="top"> | Sets the vertical alignment for cell(s) ("top", can also be "middle" or "bottom") |
| <td colspan="2"> | Sets the number of columns a cell should span |
| <td rowspan="4"> | Sets the number of rows a cell should span |
INPUT MASK CHARACTER SHEET
| CHARACTER | DESCRIPTION |
| 0 | Digit (0 to 9, entry required, plus [+] and minus [–] signs not allowed) |
| 9 | Digit or space (entry not required, plus [+] and minus [–] signs not allowed) |
| # | Digit or space (entry not required; spaces are displayed as blanks while in Edit mode, but blanks are removed when data is saved; plus [+] and minus [–] signs allowed) |
| L | Letter (A to Z, entry required) |
| ? | Letter (A to Z, entry optional) |
| A | Letter or digit (entry required) |
| a | Letter or digit (entry optional) |
| & | Any character or a space (entry required) |
| C | Any character or a space (entry optional) |
| . , : ; - / | Decimal placeholder and thousand, date and time separators (The actual character used depends on the settings in the Regional Settings Properties dialog box in the Windows Control Panel.) |
| < | Causes all characters to be converted to lower case |
| > | Causes all characters to be converted to upper case |
| ! | Causes the input mask to display from right to left, rather than from left to right. Characters typed into the mask always fill it from left to right. You can include the exclamation point anywhere in the input mask. |
| \ | Causes the character that follows to be displayed as the literal character (for example, \A is displayed as just A) |
COMPUTER APPLICATIONS TECHNOLOGY P1 – 2019
INFORMATION SHEET (to be completed by the candidate AFTER the 3-hour session)
CENTRE NUMBER ___________________________________________________________
EXAMINATION NUMBER _______________________________________________________
WORK STATION NUMBER______________________________________________________
| SUITE USED (Mark appropriate box with a cross (X)) | Microsoft Office 2010 | Microsoft Office 2013 | Microsoft Office 2016 | Office 365 |
| WEB BROWSER USED (Mark appropriate box with a cross (X)) | Mozilla Firefox | Google Chrome | Internet Explorer | Other (Specify) |
FOLDER NAME _______________________________________________________________