MECHANICAL TECHNOLOGY AUTOMOTIVE PAT TASK GRADE 10 2021
Share via Whatsapp Join our WhatsApp Group Join our Telegram GroupMECHANICAL TECHNOLOGY: AUTOMOTIVE
| TABLE OF CONTENT | |
| 1 | INTRODUCTION/BACKGROUND |
| 2 | TEACHER GUIDELINES |
| 2.1 Administration of PAT | |
| 2.2 Assessment of PAT | |
| 2.3 Moderation of PAT | |
| 2.4 Consequences of absence/non-submission of tasks | |
| 2.5 Time management | |
| 2.5 Declaration of authenticity | |
| 3 | LEARNER GUIDELINES |
| 3.1 Instructions to the learner | |
| 4 | SPECIALISATION |
| SECTION B: AUTOMOTIVE | |
SECTION A: (Educator Information)
INTRODUCTION/BACKGROUND
The 16 Curriculum and Assessment Policy Statements subjects which contain a practical component all include a Practical Assessment Task (PAT), i.e. a Practical or Performance Assessment Task. These subjects are:
- AGRICULTURE: Agricultural Management Practices, Agricultural Technology
- ARTS: Dance Studies, Design, Dramatic Arts, Music, Visual Arts
- SCIENCES: Computer Applications Technology, Information Technology
- SERVICES: Consumer Studies, Hospitality Studies, Tourism
- TECHNOLOGY: Civil Technology, Electrical Technology, MECHANICAL TECHNOLOGY and Engineering Graphics and Design.
A PAT allows the educator to directly and systematically observe applied competence. The PAT comprises the application/performance of the knowledge, skills and values to that subject and counts 25% (i.e. 100 marks) of the total promotion/certification mark out of 400 for the subject.
The PAT is implemented across the first three terms of the school year, which is broken down into different practical skills that make up the PAT.
Any profession requires of its members a thorough grounding in both theory and practice, and MECHANICAL TECHNOLOGY is no exception. It is emphasized that the goal of the Practical Assessment Task is to produce a skilled learner in each specialisation field. A nation's true wealth is in its manpower and education should aim to develop the talents of the learner so that he/she can contribute to the well-being of society by using scientific and technological resources with the greatest efficiency and by continuing to develop them.
To prepare a learner to develop skills in MECHANICAL TECHNOLOGY, in each specialisation field:
- An attitude where the learner can selectively assimilate ideas, gather evidence and facts, and drawing logical conclusions and put them to good use creatively and with imagination;
- A capability to express ideas and information clearly by speech, writing, sketching or drawing;
- A willingness and capability to accept and exercise responsibility, to make decisions, and to learn by experience.
Attributes such as these cannot all be achieved in a classroom. A sound knowledge of engineering science is essential to equip the MECHANICAL TECHNOLOGY learner with the necessary practical capabilities for the required processes. Training is the art of acquiring essential skills to bridge between trade theory and practice.
Practical application in the workshop must therefore be made an interesting and challenging experience, mentally and physically, with encouragement to the learner to use his/her initiative, curiosity and persistence in finding things. The giving of some degree of responsibility during practical application is very important as a stimulus and to develop self-confidence.
2. TEACHER GUIDELINES
2.1 Administration of the PAT
Teachers are requested to make copies of the different assessment criteria of the PAT document. These documents need to be distributed to the learners at the beginning of each phase of PAT to be completed. The Practical Assessment Task for Grade 10 is internally set and moderated.
Teachers must attach due dates for the different terms of the PAT task (refer to the CAPS document). In this manner, learners can easily assess their progress. Instances where formal assessments take place, it is the responsibility of the teacher to administer assessment.
The PAT should be completed in the first three terms. The PAT should be based and completed under controlled conditions (Refer to the Mechanical Technology CAPS Grade 10–12).
Teachers must ensure that each learner has a portfolio of evidence and that it is kept in a safe place.
This must be available at all times when requested for by a department official for scrutiny or moderation.
2.2 Assessment of PAT
Frequent and developmental feedback is needed to guide and give support to the learner to ensure that the learner is on the right track.
Both formal and informal assessment should be conducted in different terms to ensure that the embedded skills are covered for the PAT. Informal assessment can be conducted only to monitor progress of the term in which the learners are engaged. Formal assessment should always be conducted by the teacher and will be recorded.
2.3 Moderation of PAT
During moderation of the PAT, the term tasks will be presented to the moderator with the assessment criteria and marks obtained.
Where required the moderator should be able to call on the learner to explain the function, principles of operation and also request the learner to demonstrate the skills acquired through the capability tasks for moderation purposes.
Upon completion, the moderator will, if necessary, adjust the marks of the group up or downwards depending on the decision reached as a result of moderation.
2.4 CONSEQUENCES OF ABSENCE/NON-SUBMISSION OF TASKS
If a learners’ Practical Assessment Task is incomplete or unavailable with valid reason, the learner will be given three weeks before the commencement of the final end-of-year examination to submit outstanding task. Should the learner fail to fulfill the outstanding PAT requirement, such a learner will be awarded a zero for that PAT component.
A learner's results are regarded as incomplete if he/she does not offer any component of the PAT task. He/she will be given another opportunity based on the decision of the Head of the assessment body.
Should the learner fail to fulfill the outstanding PAT requirement, the marks for these components will be omitted and the final mark for Mechanical Technology will be adjusted for promotion purposes in terms of the completed
2.5 Management Plan:
Phase 1: Complete at the end of first term – April.
Phase 2: Complete at the end of second term – July.
Phase 3: Complete during third term - End of September.
Phase 4: Plan and start task during term one and complete at the end of September (third term).
2.6 DECLARATION OF AUTHENTICITY
NAME OF THE SCHOOL: ………………………………………………………..
NAME OF LEARNER: …………………………………………..………………...
(FULL NAME(S) AND SURNAME)
EXAMINATION NUMBER: ……….……………………………………………….
NAME OF TEACHER: …………………………………………………………….
SCHOOL STAMP
|
I hereby declare that the project submitted for assessment is my own, original work and has not been previously submitted for moderation.
Any theoretical questions in the practical task were done under exam conditions and assessed by the teacher. Answers were not copied from the text books.
_____________________________________ ______________________
SIGNATURE OF CANDIDATE DATE
Teacher Declaration
As far as I know, the above declaration by the candidate is true and I accept that the work offered is his or her own.
Each learner was tested individually on the tasks he/she performed individually under my supervision and marked/assessed while he/she performed the task under exam conditions.
_____________________________________ ______________________
SIGNATURE OF TEACHERS DATE
3. LEARNER GUIDELINES
3.1 Instructions to the learners
- The Practical Assessment Task (PAT) consists of specialisation task in Automotive. The practical work is spread over three terms as set out in each of the specialisation areas.
- All tasks must be completed according to the time frames set out in each of the tasks.
- Learners are required to actively engage in all practical assessment tasks.
- Learners who are un-cooperative will receive demerits or a zero-mark allocation for that particular section of the work.
- Learners, who act unsafely in the workshop and place other learners in danger, will be removed from the workshop and given additional corrective tasks to improve their safety awareness.
- ALL PRACTICAL TASKS MUST BE DONE ON ACTUAL ENGINES OR COMPONENTS AS SUPPLIED BY THE TEACHER TO YOU (EXCEPT FOR THE RESEARCH TASKS).
- LEARNERS TO COMPLETE THE PHASES OF EACH PAT AFTER HE/SHE HAD TIME TO EXPLORE AND PRACTICE THE TASK. ONLY THEN THE TASK IS TO BE COMPLETED UNDER THE SUPERVISION OF THE TEACHER
- WORKSHEETS OR ANY WRITTEN WORK DONE BY YOU MUST BE KEPT IN AN PORTFOLIO FILE AS EVIDENCE
SECTION B: THE PRACTICAL ASSESSMENT TASK GRADE 10
AUTOMOTIVE
The Practical Assessment Task (PAT) consists of FOUR Phases, one per term over term 1 to 3, with the Phase 4 Task that can be started in the First Term and completed in the Third Term – Thus spanning all three terms. Term 4 is reserved for the final theoretical content and revision.
NO PAT’s in fourth term!
TERM ONE: PHASE ONE / PAT ONE
Grade 10 Automotive
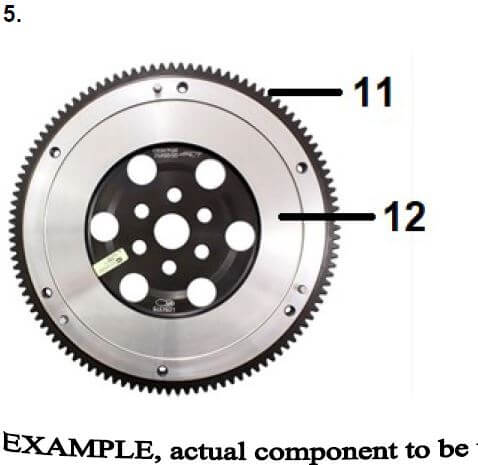
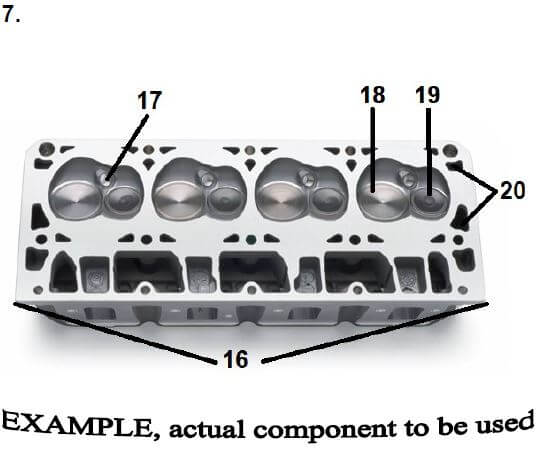
ENGINES (SPECIFIC): Identification and installation Task
Procedure:
The outcome of this task is to assess the learner’s skills and ability to understand the relationship between the different hand tools in the workshop and how to convert this knowledge into useful skills by dismantling an internal combustion engine, identifying the parts and assembling the engine or parts thereof, back to original condition / status. The understanding of Engineering Graphic and Design will relate to this task as the learner must be able to refer to, two dimensional drawings of components and relate this to the identification process in the workshop.
READ ALL THE INSTRUCTIONS FIRST THEN PROCEED
FOLLOW ASSESSMENT INSTRUCTIONS AS INDICATED
Resources Required:
- FOUR and TWO stroke Internal Combustion Engines and / or parts that can be assembled as units.
- Parts may be separate items but such that Learners can experience the complete unit.
- Appropriate tools and equipment to dismantle and assemble specified parts.
- Appropriate Personal Protection Equipment (PPE).
Instructions for phase one task
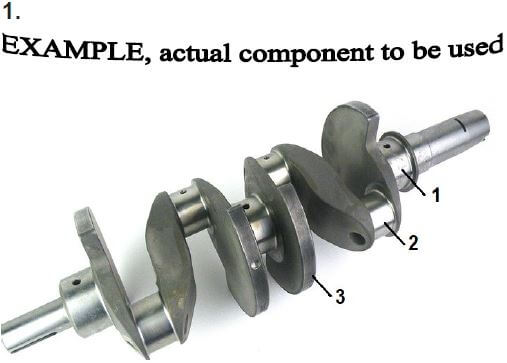
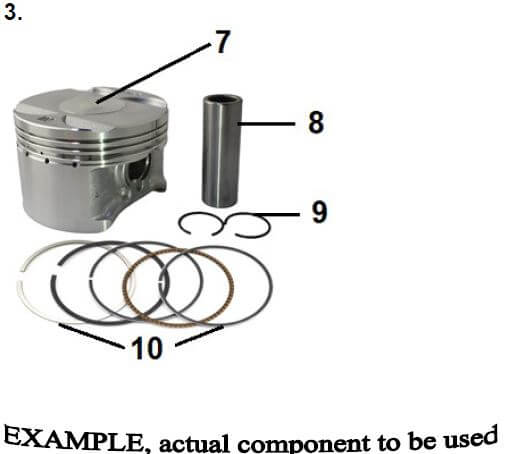
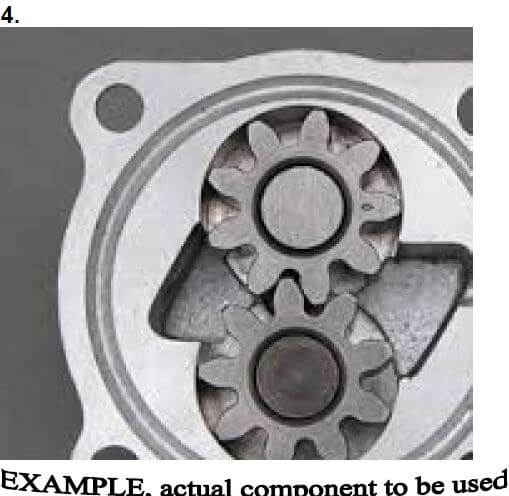
- Teacher to do a practical lesson whereby engine components are shown and discussed with learners. Explain the following by using actual components of engines:
1.1 Name of component.
1.2 Material used to manufacture component. Reasons/advantages for specific material to be used.
1.3 Explain the function of each component.
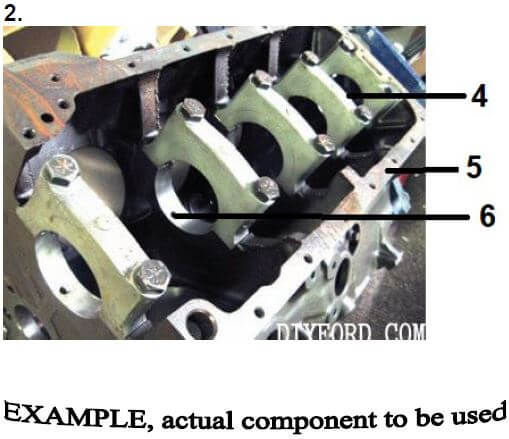
1.4 Engine block and cylinder head must be explained thoroughly with all components removed.
1.5 On engine block give specific attention to water jackets and oil channels. Explain reasons for different size water jackets between front and rear cylinders.
1.6 Identify main oil channel and all other oil channels running in engine block to various components for lubrication. It is important that this is discussed properly with learners as you will refer back to it when discussing the maintenance chapter. - After you have discussed above with the learners give them a chance to experience / investigate on their own. Learners must know the TWO and FOUR stroke internal combustion engines. Multicylinder engines should be used for this project.
- Ensure you know the functions / use of the different parts in Internal Combustion Engines.
- Experience / investigate these parts practically and individually.
- After the investigation and practice you should know all the components of the 2 and 4 stroke internal combustion engines and be able to explain how the different parts are fitted to the various engines.
- Each learner must know the function of each component and the material it is made of.
- Learners must be able to point out components cast into the engine block and cylinder head for example: water jackets, oil channels, oil return to sump, placement of oil pump and water pump etc.
- After learners have been given a chance to investigate and experience on their own a practical exam must be set up by the teacher where each learner is given the chance to identify a certain number of components.
- Teacher to ask for 1 or 2 days during a test or exam cycle to be included into the time table where learners will come to you individually and being tested on actual engine components.
- Each component must only be marked with a number and learner must answer on a worksheet prepared by the teacher. Take note this is a PAT task and must be treated as a practical examination. Proof must be kept for moderation. Marks awarded to learners identifying components on pictures or theoretically will not be accepted. Only where a learner has identified actual components from a engine that you have numbered exactly as on the work sheet will be accepted. Learners only receive and complete the work sheet on the day of the practical exam.
Each teacher to test learners during exam time under exam conditions.
ENGINE WORK SHEET PHASE 1
| GRADE: 10 | YEAR: 2021 | SCHOOL: | ||
DATE STARTED: | DATE COMPLETED: | |||
| SUBJECT: Automotive | EDUCATOR: | |||
| PROJECT: PHASE ONE | NUMBER OF LEARNERS IN CLASS: | |||
| Term One Pat Phase One | ENGINES (SPECIFIC): Identification Task | |||
The Component/Part | INSTRUCTIONS |
| ANSWERS | Marks |
 |
| 1 1 3 1 1 | 7 | |
 | 6. Identify component no 4. | 1 1 1 1 1 | 5 | |
 | 11. Identify component no 7. | 1 2 1 1 1 1 1 2 | 10 | |
 | 19. Identify the component on the left. | 1 3 4 | 8 | |
 | 22. Identify the component on the left. | 1 2 1 1 | 5 | |
 | 26. Identify the component no 13. | 1 1 1 1 1 2 2 1
| 10 | |
 | 34. Identify component 16. | 1 1 1 1 1
| 5 | |
| TOTAL | 50 | |||
SIGNATURE LEARNER | DATE: | |||
| SIGNATURE EDUCATOR | DATE: | |||
| SIGNATURE SUBJECT MODERATOR | DATE: | |||
| GRADE: 10 | YEAR: 2021 | SCHOOL: | |
| DATE STARTED: | DATE COMPLETED: | ||
| SUBJECT: Automotive (Mechanical Technology) | EDUCATOR: | ||
| PROJECT: | NUMBER OF LEARNERS IN CLASS: | ||
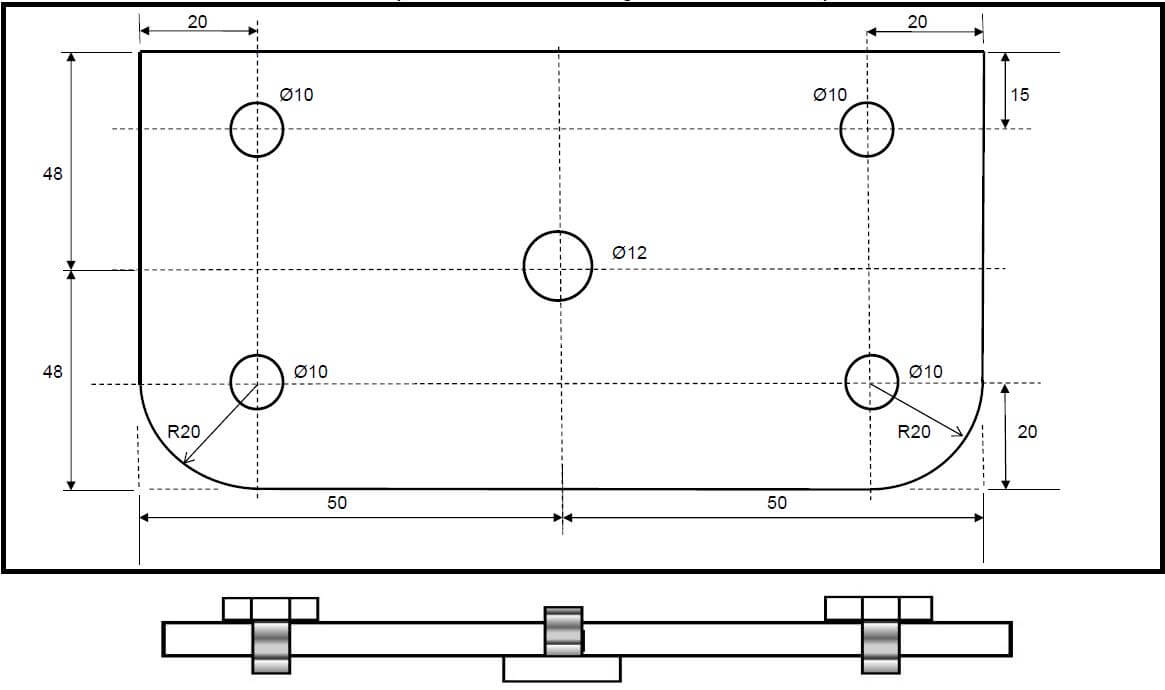
| Term Two PAT Phase Two | JOINING: Plates and thread cutting | ||
Resources Required:
- Mild steel flat bar of 100mm (length) x 96mm (breadth) x 5mm (thickness). (if flat plate is used, ensure that two sides are parallel to each other, i.e all angles must be 90⁰).
- Appropriate metal hand files.
- Vernier and other measuring equipment (callipers, steel rule etc).
- Marking medium (Engineers blue, Koki pen, chalk etc.)
- Marking off instruments (Square, combination square, scriber etc.)
- Appropriate Personal Protection Equipment (PPE).
- Centre punches.
- Hammers.
- Hacksaw.
- Appropriate sized Twist Drill bits to enable M10 and M12 threads to be cut.
- Press drilling machine.
(If a hand drill machine is used, then use a large engineer’s square against the drill machine or some similar jig, to ensure a perpendicular hole)
Instructions:
11) Use a marking medium to prepare the two ends of the material for marking (96mm width).
12) Use a steel rule to check / ensure that the material can be cut / filed / worked down to 100mm in length i.e. if pre-cut pieces are used the starting length should be about 120mm.
13) Use engineers square on either of the 100mm ends of the material to plan a square line.
14) Use a scriber to scribe this straight square line about 4mm from the rough edge.
15) Use the square and scriber on the opposite end of the material to scribe a straight, square line so that the material between the lines is 100mm in length. (ensure lines are parallel)
16) Request an informal assessment on the marked lines before proceeding.
17) By cutting with a hacksaw about 1-2mm on the waste side of the above lines, demonstrate your hacksaw skill by cutting off the excess material parallel to the scribed lines. (Do NOT cut on the line).
18) Request a formal assessment on your ability to cut straight before proceeding (4).
19) First use a rough-cut bastard file to file both ends, use the engineers square regularly to check that you are filing the width square (along the 96mm edge) AND for square-ness across the 5mm thickness.
20) Request a formal assessment on your ability to file all four sides square and to size, before proceeding (10).
21) Then using a smooth double cut file, complete the filing process, so the material is reduced to 100 x 96mm with square corners and thickness, according to the tolerance table as in Annexure A.
22) Request formal assessment on ability to file square to tolerance (7).
23) Measure from one end 50mm, to establish and scribe a straight square line across the centre width of the plate.
24) On this line measure from one 100mm edge, 48mm along the line to establish and mark the centre of the line above and thus the center of the rectangular plate.
25) Use the centre punch to mark this point for drilling.
26) Request informal assessment on your ability to mark and punch this centre point, before proceeding (5).
27) Measure and mark a point 20mm from each end on the 100mm length. 28) Scribe a line across the width of the material at the 20mm marks, parallel to the mid line scribed earlier.
29) Along one 20mm line, measure and mark from both sides 20mm inwards and centre punch these TWO marks in preparation for drilling.
30) Use this punch mark to scribe the two 20mm radii on the two corners
31) Along the other 20mm line, measure and mark from each side 15mm inwards and centre punch these TWO marks in preparation for drilling.
32) Cut off on the waste side of the scribed radii lines.
33) File down to the line, in two stages, firstly with a bastard file and then a double cut smooth file to complete the radii to a smooth finish.
34) Request formal assessment on your ability to mark and punch these centre points accurately and the filling of the radii, before proceeding (6+5).
35) Use a press drill machine drilling a hole, center of the plate suitable to cut a M12 thread. (Ensure the hole is perpendicular, using large engineers square if hand drill is used!)
36) Request an informal assessment / guidance on attempt and required skill to drill the other holes perpendicular to the surface, before proceeding.
37) Use a press drill machine to drill four holes on the center punched holes positioned on the 15 / 20mm cross lines and the 20 / 20mm cross lines on the plate, suitable to cut a M10 thread. (Ensure holes are perpendicular, use large engineers square if hand drill is used!)
38) Place the drills in the holes, use an engineer’s square up against the drill to testing square.
39) Hand task in for formal assessment on your ability to drill perpendicular holes (1+4).
40) Using a thread cutting tap, cut appropriate 1x M12 and 4x M10 thread in these five holes, square to the surface.
41) Test for effective square thread by turning-in a long M12 and M10 bolt or threaded rod and an engineer’s square, up against the rod.
NOTE - Safety and Finishing (-5) is the last assessment component that may apply:
- A maximum of Five NEGATIVE marks allocated.
- Less 1 mark for vice (jaw) damage - clamping marks for overtightening or loose slip.
- Less 1 mark for lack of overall manufacturing competency in finishing / “look” of completed task related to surface finish, edges, square-ness, centrality, etc.
- Less 1 mark: Repetitive disregard for the use of PPE and safe use of tools and equipment, while working in the workshop.
- Less 1 mark: Another negative mark for continuing to have a disregard for the use of PPE and safe use of tools and equipment, while working in the workshop.
- Less 1 mark: Quality versus Time – “rush” job vs inefficient time to complete a good job.
42) Hand the task in for formal assessment on your ability to cut square / perpendicular thread in different sized holes (5).
43) Clean any burs, roughness and dirt caused by the drilling, cutting and manufacturing process.
44) Hand the task in for formal final assessment on your ability to clean your project (3).
Grade 10 – Automotive 2021
Term Two: PAT Two
Tools Template Task – Manufacturing Multi-Functional Template
| GRADE: 10 | YEAR: 2021 | SCHOOL: | |
| DATE STARTED: | DATE COMPLETED: | ||
| SUBJECT: Automotive (Mechanical Technology) | EDUCATOR: | ||
| PROJECT: | NUMBER OF LEARNERS IN CLASS: | ||
PAGE ___ of ___ | Tools: Multi-functional Template Task | ||
| FACETS | Ability to cut 2 sides straight with the hacksaw (2 + 2) | Square-ness of ALL 6 sides and the 4 perimeter sides | Filing to length 100cm according to tolerance table | Filing radii (2 × 3) | Marking and punching holes (1 × 5) | Drilling of 1 × 12mm holes | Drilling of 4 × 10mm holes | Drilling square - compared relevant to the edges | Cutting of thread perpendicular to surface | Removal of burs and dirt | Negative marks: lack of safety, task & tool, damage and time on task. | ||
| Preparation, filling and marking | Drilling and thread cutting | Safety, finish and time | TOTAL | ||||||||||
| 4 | 10 | 7 | 6 | 5 | 1 | 4 | 5 | 5 | 3 | -5 | 50 | ||
| 1 | |||||||||||||
| 2 | |||||||||||||
| 3 | |||||||||||||
| 4 | |||||||||||||
| 5 | |||||||||||||
| 6 | |||||||||||||
| 7 | |||||||||||||
| 8 | |||||||||||||
| 9 | |||||||||||||
| 10 | |||||||||||||
| 11 | |||||||||||||
| 12 | |||||||||||||
| 13 | |||||||||||||
| 14 | |||||||||||||
| 15 | |||||||||||||
| 16 | |||||||||||||
| 17 | |||||||||||||
| 18 | |||||||||||||
| 19 | |||||||||||||
| 20 | |||||||||||||
| SIGNATURE EDUCATOR | |||||||||||||
| SIGNATURE HEAD OF DEPARTMENT | |||||||||||||
| SIGNATURE SUBJECT ADVISOR | |||||||||||||
| SIGNATURE HEADMASTER | |||||||||||||
ANNEXURE A
| TOLERANCE | MARKS | CUTTING AND MANUFACTURING | FILING | ANGLES IN DEGREES | |
| DIAMETER | LENGTH | MEASURE 4 PLACES | MEASURE 2 PLACES | ||
| + 0.8 | + 0.8 | + 0.8 | + 1.5 | ||
| - 0.8 | - 0.8 | - 0.8 | - 1.5 | ||
| DEVIATION | 7 | 0.2 = 100% | 0.2 = 100% | 0.2 = 100% | 0.25 = 100% |
| 6 | 0.3 = 85% | 0.3 = 85% | 0.3 = 85% | 0.50 = 75% | |
| 5 | 0.4 = 70% | 0.4 = 70% | 0.4 = 70% | 0.75 = 75% | |
| 4 | 0.5 = 60% | 0.5 = 60% | 0.5 = 60% | 1.00 = 50% | |
| 3 | 0.6 = 40% | 0.6 = 40% | 0.6 = 40% | 1.25 = 25% | |
| 2 | 0.7 = 25% | 0.7 = 25% | 0.7 = 25% | 1.50 = 25% | |
| 1 | 0.8 = 10% | 0.8 = 10% | 0.8 = 10% | 1.75 = 0% |
| GRADE: 10 | YEAR: 2021 | SCHOOL: | |
| DATE STARTED: | DATE COMPLETED: | ||
| SUBJECT: Automotive (Mechanical Technology) | EDUCATOR: | ||
| PROJECT: | NUMBER OF LEARNERS IN CLASS: | ||
| Term Three PAT Phase Three | Maintenance, systems and control | ||
INSTRUCTIONS AND MATERIAL NEEDED
TAKE NOTE:
- PAT task is about developing practical skills. Therefore, accuracy and skills that learner acquire completing the task is vital.
- Each learner must complete the task.
- Teacher to guide learners with completion of PAT
- This component of PAT must be marked by teacher as learners are busy doing it.
- Teacher to compile own mark sheet according to instruction and equipment you have
Equipment, tools and material needed:
- Running and non-running engines
- Radiator tester
- Thermometer
- Engine components
- Multimeter
- Electronic and electrical components
- Lead acid storage battery
- Tools and equipment
Phase 3 task will consist of 2 sections namely: A maintenance B Systems and control
Section A – Maintenance – All results of this practical task must be recorded in the learners’ portfolio of evidence.
- Do a visual inspection on the cooling system of the running engine and report on the condition of the following:
- Radiator
- Cooling fan
- Hoses
- Belts
- Leaks (5)
- Testing of thermostat. Procedure and results to be recorded in learner’s portfolio. (10)
- Testing of radiator cap. Procedure and results to be recorded in learner’s portfolio. (5)
- Pressure test cooling system. Procedure and Results to be recorded in learner’s portfolio. (10)
- Identify the following components on the engine:
Main oil channel (2)
Oil pressure relieve valve (1)
Type of oil feed system (motivate) (1)
Type of oil pump (1)
Section B – Systems and Control
Multimeter:
Use a multimeter and test amp, ohms and voltage on any circuit/s. (9)
Lead Acid Type battery:
Use a 12-volt lead acid storage battery and copy the information displayed on the casing and explain what each item means. (Any 5) (5)
| GRADE: 10 | YEAR: 2021 | SCHOOL: | |
| DATE STARTED: | DATE COMPLETED: | ||
| SUBJECT: Automotive (Mechanical Technology) | EDUCATOR: | ||
| PROJECT: | NUMBER OF LEARNERS IN CLASS: | ||
| Term four PAT Phase four | Terminology - Drive trains | ||
INSTRUCTIONS AND MATERIAL NEEDED
TAKE NOTE:
- PAT task is about developing practical skills. Therefore, accuracy and skills that learner acquire completing the task is vital.
- Each learner must complete the task.
- Teacher to guide learners with completion of PAT
- This component of PAT must be marked by teacher as learners are busy doing it.
- Teacher to compile own mark sheet according to instruction and equipment you have
Equipment, tools and material needed:
- Manual synchromesh gearbox – transaxle (front wheel drive could also be used)
- Clutch assembly and fly wheel
- Tools and equipment
INSTRUCTION:
- Each learner to dismantle gearbox completely. Maximum two learners per gearbox) (10)
- Compile a condition report on all components (gears, shafts, bearings, selector forks and synchro units)
Each learner to compile a list of the 30 components they inspected and comment on condition of each component. 30 x 2 = (60) - Do a sketch of the gears in the gearbox and use different colour pens to show the following. Power flow through gearbox of 1st, 2nd, and 3rd, top gear and reverse. 5 x 3 = (15)
- Assemble gearbox. The following should help you to award the marks:
Gearbox correctly assembled with no excess parts/missing parts and all shafts turning freely.
Learner able to select all gears without difficulty.
No obvious bolts missing or damaged.
In other words, 100% correctly assembled. (15)
Deduct 2 marks for each component not correctly re-installed.
Marks to be deducted if gears cannot be selected or shafts not able to turn. (Maximum of 5 Minimum marks learner can achieve for assembly is 4 marks.
Unless gearbox is not assembled at all a learner will get zero for assembly.